
Changing a few Windows 11 Registry entries can make using your PC much more enjoyable. Don't worry, it's much easier to do than it sounds. We explain everything to you.

- Change these 6 registry entries to make Windows 11 more pleasant to use
- Disable Bing results in the Start menu
- Re-enable the classic, clearer contextual menu
- Disable the Start page in Windows 11 Settings
- Disable the Windows lock screen 11
- Disable automatic Windows 11 updates
- Reactivate automatic registry backup
- Comments
Windows 11 isn't a complex system for the average user. Over the years, Microsoft has managed to make it more intuitive, allowing many people to get up and running in just a few hours.
But lack of complexity doesn't mean simplistic. If you dig a little deeper, you'll realize that Windows 11 is full of customization options and features to tailor it to your needs and preferences.
Some are located directly in Settings, while others require some manipulation, such as disabling Windows services to increase your PC's performance. The changes we're suggesting you make here require you to go through the Windows 11 Registry Editor.
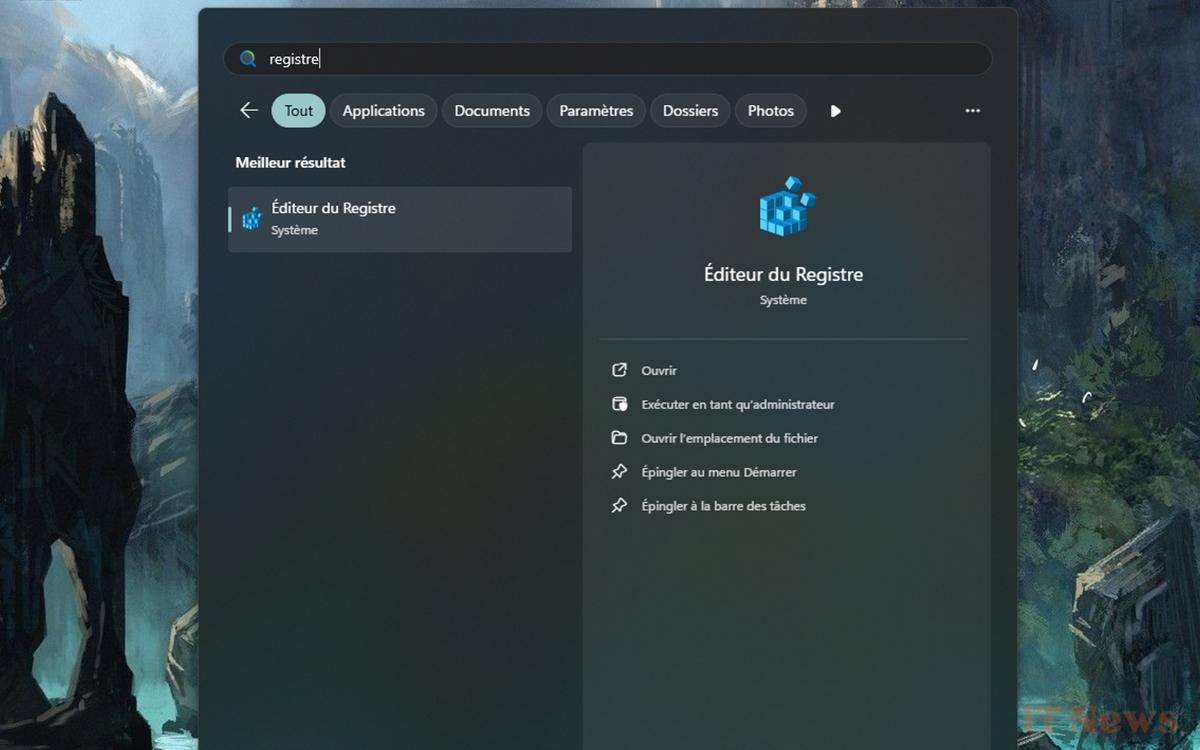
Don't worry, it's much simpler than it looks. As long as you follow the steps below, you'll have no problems. Be aware, however, that you shouldn't mess with the Registry and that errors can occur. To be on the safe side, we recommend that you first back up your computer. Change these 6 registry entries to make Windows 11 more enjoyable to use. Change these 6 registry entries to make Windows 11 more enjoyable to use. As mentioned, all of the following tips use the Registry Editor. There are several ways to open it, the easiest being to type “registry” into Windows Search and click the only result. Feel free to pin it to the Start menu or taskbar to save time. Now let's get started.
When you launch a search from the taskbar, it is usually, or even exclusively, to find something on your PC. A file, a setting, an application… But by default, the results also display what Bing finds on the Internet. If, like us, you are absolutely not interested in this, you can disable this function:
- Open the Registry Editor.
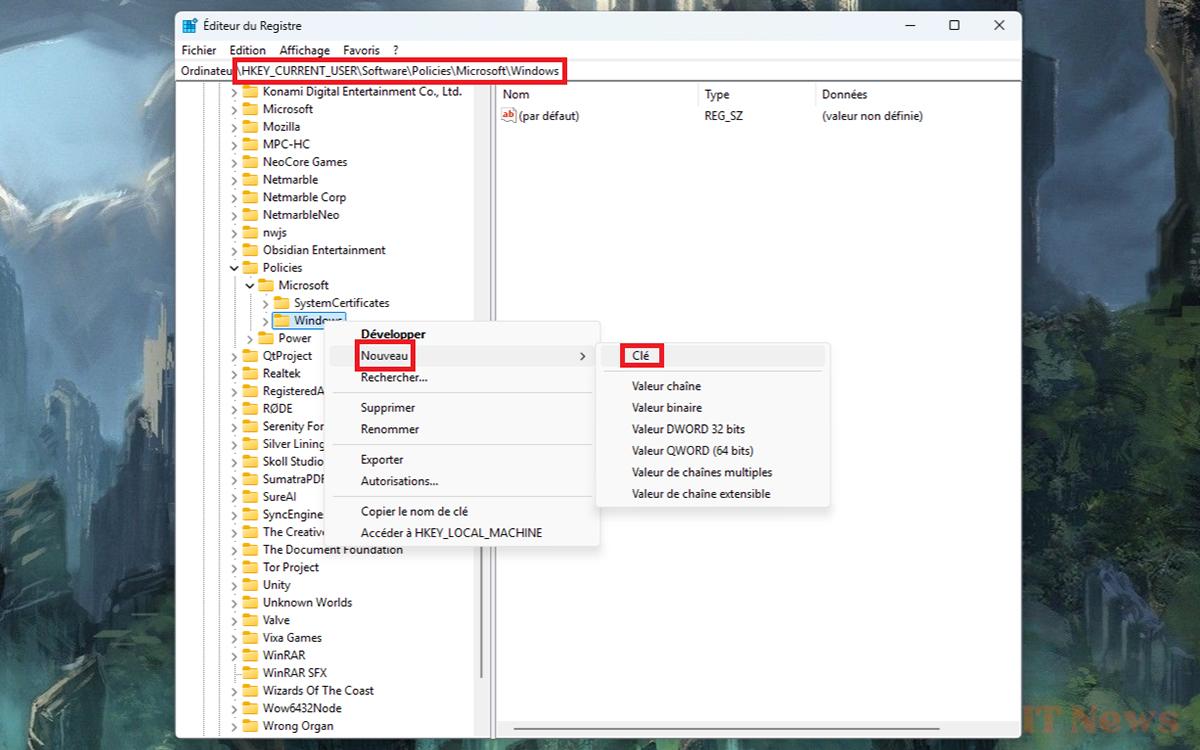
- In the drop-down list on the left, follow this path: HKEY_CURRENT_USER > Software > Policies > Microsoft > Windows.
- Right-click on the Windows folder and select New > Key.
- Name this last one Explorer and validate with the Enter key.
- Right-click on the newly created Explorer folder and choose New > 32-bit DWORD Value.
- Name the key DisableSearchBoxSuggestions and press the Enter key.
- Right-click on this key and then left-click on Modify.
- In Value Data, delete the 0 and put 1 in its place before confirming with OK.
- Close the Registry Editor and restart the PC to apply the change.
To go back, open the Registry Editor, go to HKEY_CURRENT_USER > Software > Policies > Microsoft > Windows > Explorer then, in this folder, right-click on the DisableSearchBoxSuggestions key then left-click on Delete. Restart the PC to finalize the operation.
The contextual menu, which appears when you right-click on a file or something else, has shrunk with Windows 11. Now, if you want to see all the possibilities it offers, you have to click on Show more options. A bit annoying in the long run when you often use one of these hidden options. The solution? Return to the old contextual menu. Less pretty, certainly, but more complete:
- Open the Registry Editor.
- In the drop-down list on the left, follow this path: HKEY_CURRENT_USER > Software > Classes > CLSID.
- Right-click on the CLSID folder and select New > Key.
- Name the latter {86ca1aa0-34aa-4e8b-a509-50c905bae2a2} and confirm with the Enter key.
- Right-click on the newly created folder and choose New > Key. Key.
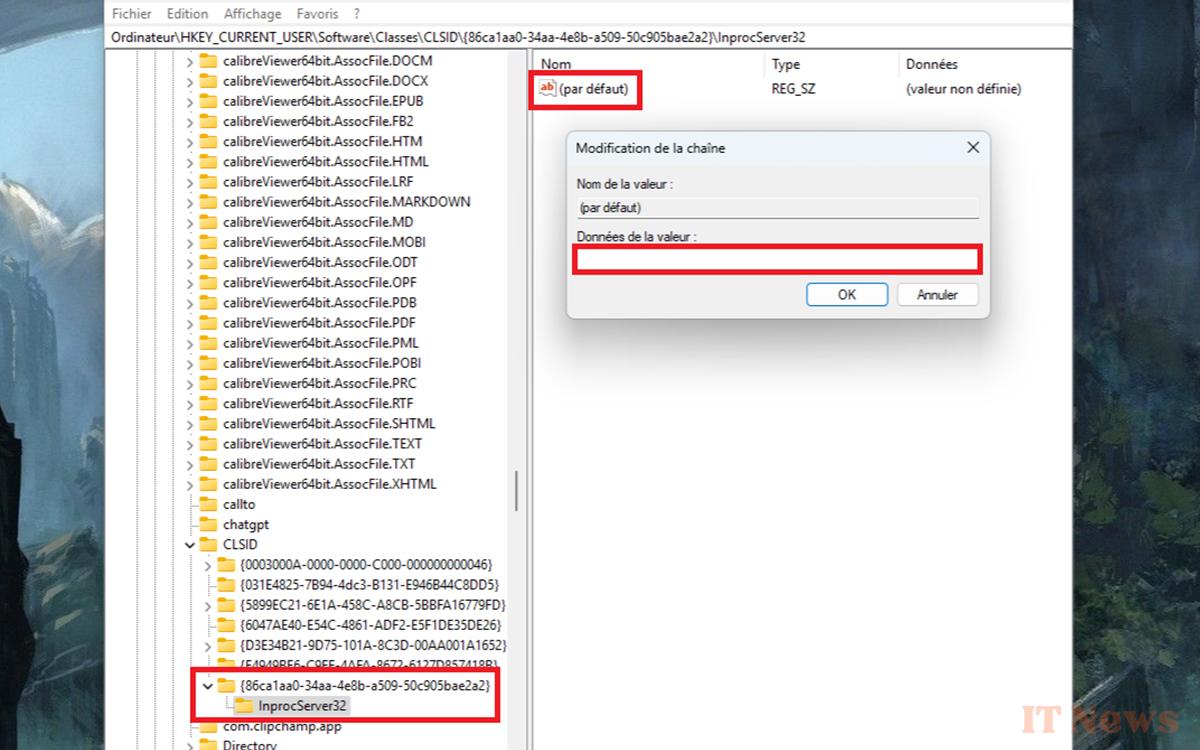
- Name the key InprocServer32 and press the Enter key.
- Right-click on this key and then left-click on Modify.
- In Value Data, delete the 0 and press OK (leave the text box empty).
- Close the Registry Editor and restart your PC to apply the change.
To return to the main menu, once the {86ca1aa0-34aa-4e8b-a509-50c905bae2a2} folder is located in the Editor, right-click on it and then Delete. Don't forget to restart your PC afterward.
Disable the Home page in Windows 11 Settings
There was a time when the Windows 11 Settings app opened directly to the System page. Today, there's a Home page that doesn't do much except display ads for Microsoft products. Well, you should know that it's possible to remove it so that the System page is the default again:
- Open the Registry Editor.
- In the drop-down list on the left, follow this path: HKEY_LOCAL_MACHINE > SOFTWARE > Microsoft > Windows > CurrentVersion > Policies > Explorer.
- Right-click on the Explorer folder and select New > String value.
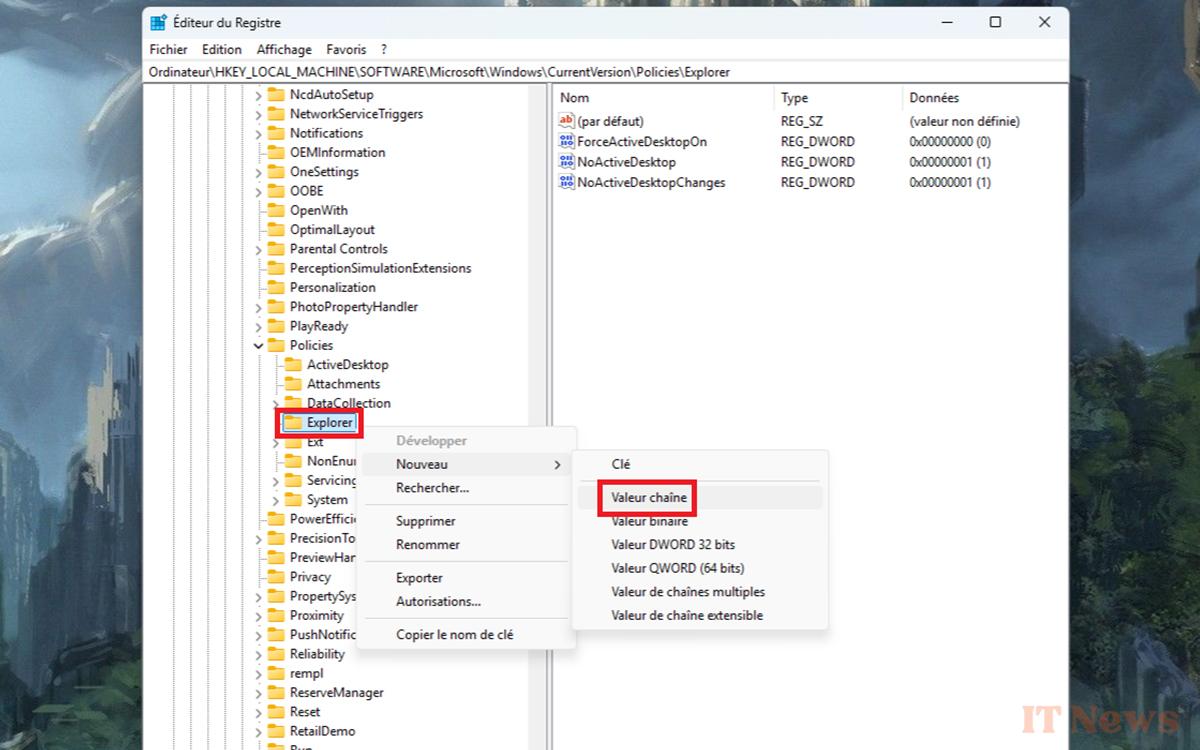
- Name this last one SettingsPageVisibility and validate with the Enter key.
- Right-click on the newly created key and choose Modify.
- In Value data, type hide:home and confirm with OK.
- Close the Registry Editor and restart your PC to apply the change.
To bring back the Home page, navigate in the Registry Editor until you see the SettingsPageVisibility key, right-click on it and choose Delete.
Disable the Windows 11 lock screen
The Windows 11 lock screen appears every time you turn on your PC or wake it from sleep, just before the one that asks you for a password, PIN, or other code. It's possible to customize it to display different information, but if you don't care, you might as well save yourself a click by disabling it:
- Open the Registry Editor.
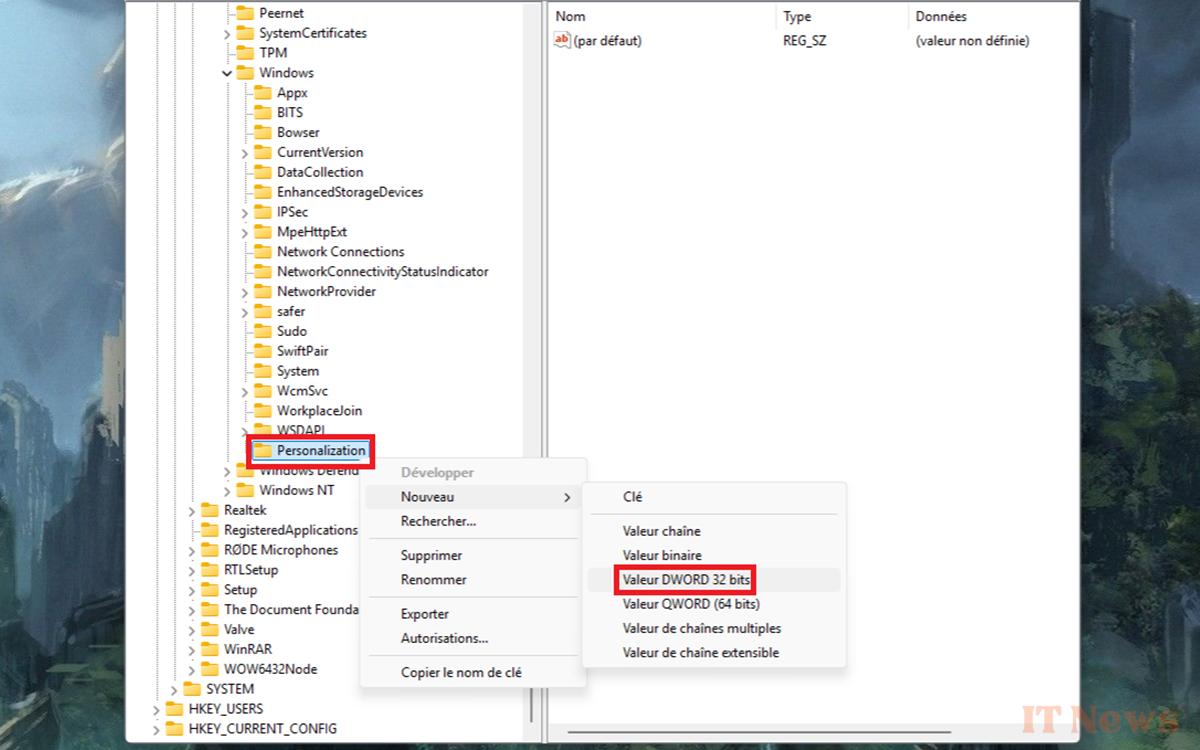
- In the drop-down list on the left, follow this path: HKEY_LOCAL_MACHINE > SOFTWARE > Policies > Microsoft > Windows.
- Right-click on the Windows folder and select New > Key.
- Name this last one Personalization and confirm with the Enter key.
- Right-click on the Personalization folder and choose New > Key. 32-bit DWORD Value.
- Name the key Nolockscreen and validate with the Enter key.
- Right-click on this key then left-click on Modify.
- In Value Data, delete the 0 and put 1 instead. Confirm with OK.
- Close the Registry Editor and restart the PC to apply the change.
As with the previous steps, deleting the Nolockscreen key by right-clicking on it then Delete allows you to get the lock screen back after restarting the PC.
Disable Windows 11 automatic updates
Here's something that not everyone will do, but which may be important depending on your usage. Updating Windows 11 is essential. It fixes problems and security flaws, while adding features. But it can also lead to major, very annoying bugs. By making sure your PC doesn't update itself, you can check user reviews to see if the patch is safe or if it's better to wait:
- Open the Registry Editor.
- In the drop-down list on the left, follow this path: HKEY_LOCAL_MACHINE > SOFTWARE > Policies > Microsoft > Windows.
- Right-click on the Windows folder and select New > Key.
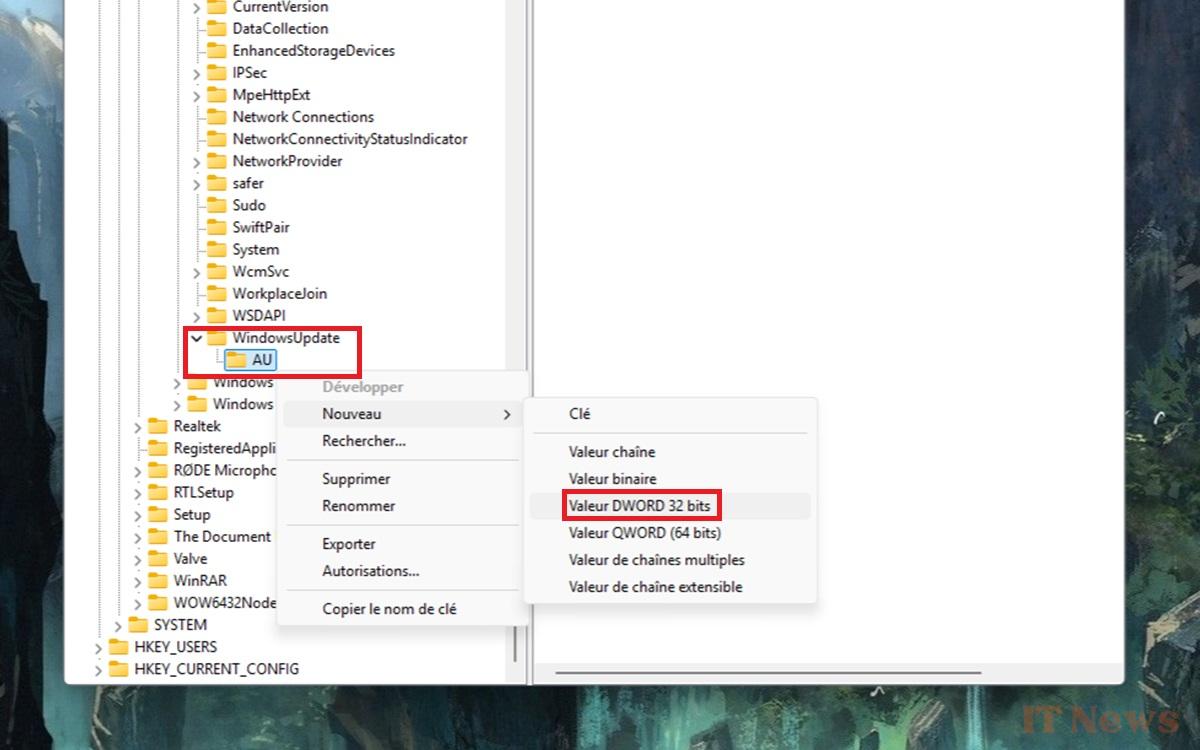
- Name this last one WindowsUpdate and validate with the Enter key.
- Right-click on the newly created WindowsUpdate folder and choose New > Key. Key.
- Name the key AU and validate with the Enter key.
- Right-click on the AU key, go to New then 32-bit DWORD Value.
- Name the key NoAutoUpdate and confirm with the Enter key.
- Right-click on this key then left-click on Modify.
- In Value data, delete the 0 and put 1 instead. Confirm with OK.
- Close the Registry Editor and restart the PC to apply the change.
From now on, you will need to go to Settings > Windows Update and click on Check for updates to choose whether or not to install them. You can return to normal operation by deleting the WindowsUpdate folder created in step 4 above from Registry Editor.
Re-enable automatic registry backup
Before Windows 11 version 1803, the system regularly made copies of the Registry. Every time the computer started up correctly, in fact. These backups were used to roll back the previous steps in case of a problem when starting up, but were abandoned to avoid taking up too much space on hard drives. Since we're happily editing the Registry, why not re-enable this feature?
- Open Registry Editor.
- In the drop-down list on the left, follow this path: HKLM > System > CurrentControlSet > Control > Session Manager > Configuration Manager.
- Right-click on the Configuration Manager folder and select New > 32-bit DWORD Value.
- Name it EnablePeriodicBackup and press Enter.
- Right-click on this key and select Modify.
- In Value Data, delete the 0 and enter 1 instead. Confirm with OK.
- Close the Registry Editor.
- Open the Start menu and type Command Prompt in the search bar.
- Right-click on the first result and choose Run as administrator.
- Copy/paste the following text into the window: schtasks /Create /TN “\MyTasks\MyRegistryBackup” /TR “schtasks /run /i /tn \”\Microsoft\Windows\Registry\RegIdleBackup\”” /SC DAILY /ST 12:00 /RU “SYSTEM” /RL HIGHEST /F
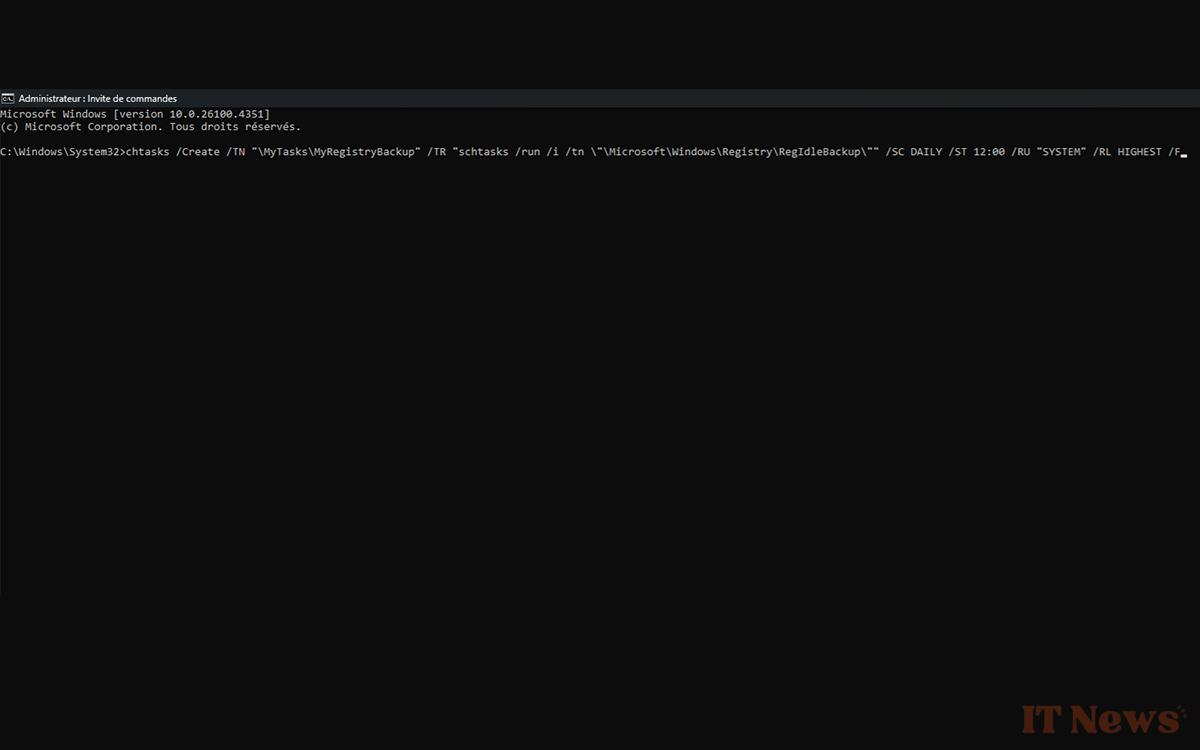
- Press Enter. This command creates a task that asks Windows to make backups of the Registry.
- The backups will be in the automatically created MyTasks folder. The MyRegistryBackup task will be triggered every day at noon (“ST 12:00”). You can change these settings by editing the appropriate items in the command line in step 10.
That's it for those tips! If you know of any others that use Registry Editor, feel free to share them in the comments section. In the meantime, take a look at our other guides to help you optimize your PC's performance. Did you know, for example, that you can save space by uninstalling these 5 unnecessary Windows 11 apps?


0 Comments